Wednesday 30 January 2013

Manokwari Desktop on openSUSE 12.2

 Manokwari is a desktop shell for GNOME 3 and it features a combined Gtk+ and HTML5 frontend. It is an evolution from a shell called blankon-panel. Manokwari is cool because :-
  • Instead of being a GNOME 2.X fork, it is a GNOME 3.X fork which means that it can support modern libraries.
  • It is lighting fast and amazingly stable and has a exotic feel to it.
  • The gnome-tweak-tool or "Advanced Settings" tool can be used to customise the desktop.
  • The default theme(Krawu) and icons(Komodo) look good.
  • It features a fully loaded "Applications menu" or "Main Menu". The main menu is scrollable and hence easy to use.
  • The main menu has a "Places" menu too where all the bookmarked folders from Nautilus appear.
  • For those who don't like the Activities hotspot in GNOME shell, the absence of the same would be a welcome relief.
  • It is the default desktop in a Linux distro called BlankOn.
Install Manokwari on openSUSE 12.2
 Manokwari desktop has been installed by me on openSUSE 12.2 on a experimental basis and this desktop is in no way supported by openSUSE. Due caution needs to be exercised by any user who tries to emulate the installation procedure described below.
Pre-requisites
  • Identify the architecture of OS we use and the type of rpm that will fit our desktop. More details about this can be found in 32 bit Vs 64 bit OS architecture in Linux.
  • We will probably need an working GNOME 3.4.2 desktop. More details can be obtained from this link.
  • Configure a Local rpm repository using YaST installer.
  • Create a new "Test user" and  Turn Off auto login. This new "Test user" profile will be used as a test bed for using Manokwari. More details about user management can be found here.
Download rpms
 Those interested in compiling and installing Manokwari from source, the link to checkout would be  BlankOn / Manokwari. The links for downloading the rpms would be as follows:-
After verifying the type of OS we use, we can proceed with downloading the relevant rpms and creating Local rpm repository as described above and place all our rpms there. Since i use a 64 bit system the rpms I required  were as follows:-
  • blankon-session-0.0.10-1.fc18.noarch.rpm
  • gnome-menus2-2.30.5-1.fc18.x86_64.rpm
  • gtk-murrine-engine-0.98.2-2.fc18.x86_64.rpm
  • gtk-unico-engine-1.0.2-2.20120808bzr139.fc18.x86_64.rpm
  • komodo-icon-theme-0.2.21-1.fc18.noarch.rpm
  • krawu-theme-0.2.16-1.fc18.noarch.rpm
  • manokwari-0.2.1.10-1.fc18.x86_64.rpm
  • redhat-menus-12.0.2-5.fc18.noarch.rpm
Install rpms
Install using zypper (CLI)
 Assuming that you have created a Local directory repository using YaST you can proceed to install the desktop using the zypper package manager. First we open command launcher(Alt+F2) and then use the command "gnome-terminal" to open a terminal session. Then we need to use the "zypper in" command and install the packages.
$sudo zypper in -f -r rpms blankon-session gnome-menus2 gtk-murrine-engine gtk-unico-engine komodo-icon-theme krawu-theme manokwari redhat-menus
Notes:-
  • sudo - Run command as super user
  • zypper - Package manager in openSUSE
  • in - Instructs zypper to install
  • -f - This force reinstalls packages(optional)
  • -r - Asks zypper to install the packages from repo named "rpms".(Local repo name created through YaST)
Install using YaST (GUI)
 To locate YaST installer on GNOME 3.X desktop, you can use the left "win" key or "Alt+F1" key combination to open "Activities" window. In this window you can start typing a search query like "install" when YaST installer will show up grouped under "Applications" as shown below.
GNOME 3.4.2 YaST Installer
 After YaST is opened you can use the drop down on the left to change the display mode to "Repositories". Then you can select the relevant repo "rpms". Finally we can select all the requires packages and hit "Apply" button to finish the installation.
YaST openSUSE 12.2 Manokwari Install rpm
Login into Manokwari and configuring things
  After creating a "Test" user I logout from GNOME shell and login into "Test" and select the session as "BlankOn" as shown below
openSUSE 12.2 Manokwari GDM BlankOn
 The default desktop looks like the below screenshot and is not very appealing. There are no desktop icons. The icons and main menu in the top panel are almost invisible.
openSUSE 12.2 Manokwari Default desktop
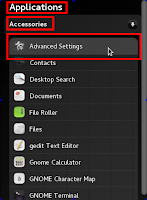
 I proceed to customise the desktop using "gnome-tweak-tool" or "Advanced Settings" tool. I can find this tool in the main menu under "Accessories".
openSUSE 12.2 Manokwari Main Menu
I change the icons theme to "komodo", window and GTK+ themes to "Krawu". I also enable 'icons' in menus and buttons.
openSUSE 12.2 Manokwari Gnome Tweak Tool Theme
Then it is time to bring the desktop icons back by setting Nautilus as desktop manager. By doing this right click on desktop also gets enabled :-).
openSUSE 12.2 Manokwari Gnome Tweak Tool Restore Desktop Icons Nautilus
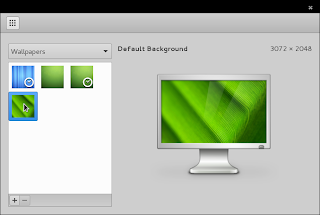
 Then i can open "Settings" or "gnome-control-center" using the Main menu and change the wallpaper
openSUSE 12.2 Manokwari Menu Gnome Control Center Settings
Changing wallpaper in gnome-control-center
openSUSE 12.2 Manokwari Gnome Control Center Wallpaper
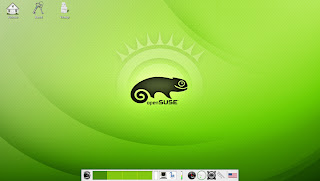
After changing Icons, themes and wallpaper, the desktop feels better and more usable.
openSUSE 12.2 Manokwari Desktop with icons
How to use Manokwari ?
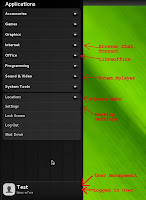
Main Menu
The Manokwari main menu is well designed, scrollable and is the place where you can access all your installed applications.
openSUSE 12.2 Manokwari Main Menu
Task bar
The taskbar / top panel which sits at the top of the DE consists the following controls:-
  • Main menu launcher at the extreme left. It is represented by BlankOn icon (O|)
  • Icons showing currently "running" applications show up to the right of Menu launcher.  On "mouse over" of any one of the icons the description is shown. You can switch between applications using these icons.
  • At the right end is is the workspace switcher. It also has a "show desktop" or "minimize all windows" button.
  • To it's left sits the "system tray" with calendar, volume changer and other tray icons.
openSUSE 12.2 Manokwari Top Panel
 Screenshot showing Totem playing Top tracks from Jamendo and Geany compiling a simple java program
openSUSE 12.2 Manokwari Geany Java Totem Jamendo
Conclusion
 For those who don't like GNOME Shell, Cinnamon and Manokwari offer viable desktop alternatives with all familiar GTK+ bells and chimes. Sometimes when you log-in into the desktop, we will find that the desktop icons are not click-able. This anomaly almost drove me crazy and was about to remove the DE when I found the solution. When i was messing around with dconf-editor i saw a setting called Switch system controls ("switch-panels") under the schema "org.gnome.desktop.wm.keybindings". The default settings to use this function is "<Control><Alt>Tab" . This keybinding allowed me to switch to "Desktop" mode which allowed me to use the desktop icons again. Vote may opt to for inclusion of Manokwari in openSUSE here.

Sunday 27 January 2013

32 bit Vs 64 bit OS architecture in Linux

Importance of architecture
 In Linux you need to know the architecture of your underlying OS especially in a rpm based distro as:-
  • Software packages are specifically prepared and targeted at specific architecture.
  • Installation paths for the binaries are different architectures.
  • It is believed that there would be major performances differences if the correct version of package is used on a machine compared to incorrect one.
Types of software packages
  • 32 bit packages are generally named as *i386*.rpm , *i586*.rpm, *i686*.rpm. It is possible that though your CPU is 64 bit you may be  running a 32 bit OS. Please consider avoiding installing packages of type *i386*.rpm as Linux is going to remove support for them starting with kernel version 3.8. Also i386 packages may perform poorly when installed on modern day machines.
  • 64 bit packages truly support 64 bit addressing and are generally named as x86_64*.rpm.
64 bit vs 32 bit OS
 If it comes to choosing an OS  version to install you need to consider doing the following:-
  • Check whether your CPU supports 64 bit or 32 bit addressing. The booklet that you get when you purchase your machine will help you in this regard. Most of the newer generation machines do support 64 bit addressing.
  • Download Live ISOs of both kinds (32 as well as 64) and test them on your machine without installing the OS itself. You can get 32 bit as well as 64 bit ISOs for many distros. For example, you can download stable versions of openSUSE from this page. Sample download page is shown below.
  • LIVE ISO GNOME 32 bit  64 bit OPENSUSE
  • Check whether all the software you need on a day to day basis are available as 32 or 64 bit rpms. This may be the Go or No-Go for deciding on the version of OS unless you are willing to compile and install your software packages. For example, you many find that in software.opensuse.org "google-earth" is  offered only as a 32 bit rpm.
  • software.opensuse.org
Check version of OS you use
 There are various way to check the OS architecture. For starters, I am running a 64 bit OS and use GNOME 3.4.2 / openSUSE 12.2 .On my machine i can check my OS info in following ways.
Using CLI
 All you need to do to check the OS version is to run the command "arch" in terminal. You can use the command "gnome-terminal" in command launcher (Alt+F2) to open the terminal and use the "arch" command.
Sample output on 64 bit OS
arch Sample output on 64 bit OS
Sample output on 32 bit OS
arch Sample output on 32 bit OS
Using GUI
 I can check the my OS version by checking info from Gnome System Monitor in the "System" tab.  I open command launcher (Alt+F2) and use the command "gnome-system-monitor" and i can check all the relevant details as shown below.
GNOME System Monitor openSUSE 12.2

Weather forecast gadget,much more about E17 on openSUSE 12.2

 I had earlier already written about  "openSUSE trying to offer E17 as mainline desktop" which covered topics like installation of E17 on openSUSE and "Changing backgrounds and themes in E17 openSUSE 12.2". Through this article I hope to cover left-over bits and pieces about E17 on openSUSE 12.2.
Install useful E17 packages
Using zypper
 After installing E17 on openSUSE as described in the articles written earlier we can install some useful packages like weather forecast module,themes, mines game, shellmentary (zenity like pop ups ) etc...
sudo zypper in shotgun elemines e-theme-a-os-detour e-theme-a-os-green e-theme-a-os-miguel-v3 e-theme-a-os-vision-v3 e-theme-darkness e-theme-efenniht e-module-forecasts shellementary
Notes:-
sudo - use command as super user
zypper- package manager
in - parameter to indicate install
Using YaST
 After invoking YaST installer you can easily select the repositories drop down and select the E17 repository and select and install the relevant modules by right clicking and install them as shown below.
YaST E17 Theme Install
Configure Weather Forecast Gadget on E17 / openSUSE 12.2
Enable Forecasts Module
 You need to first open the main menu and navigate to Settings and then Modules menu. In the "Module Settings"  you can select "Forecasts" module and press the "Load" button to activate this module.
Enable Forecasts Module
Add Forecasts Gadget to Shelf
 You can right click on the standard E17 dock or "Shelf" and then open "Contents" submenu . In the "Shelf Contents" window you can select "Forecasts" gadget and click on "Add Gadget" button to add the Gadget to the Shelf.
Add Forecasts Gadget to Shelf
Configure Forecasts Gadget
 To change "Forecasts"  settings like city ,Units(Celsius, Fahrenheit) etc you can can right click on the Gadget or Widget and then choose Settings submenu. To get the Forecasts code you need to go to www.weather.com and get the weather codes for your city.You can use this code in the "Forecasts" gadget.
Getting Weather codes from weather.com
Changing Forecasts settings
E17 developing its own set applications
  E17 developing its own set applications to become a full fledged DE and reduce reliance on applications from from other DEs.The following screenshot shown a game called elemines which is based on Enlightenment Foundation Libraries (EFL) , Terminology which is a cool terminal emulator for E17, E17's own built in file manager, Shotgun which is a XMPP (jabber) client using EFL libraries. I could easily connect with my gtalk contacts using shotgun.
Screenshot showing Elemines, Terminology, Shotgun and E17 file manager
Elemines, Terminology, Shotgun and E17 file manager
Enable Shelf Auto Hide
 Shelf which is the default dock on E17 can be set to "auto hide" state by right clicking on Shelf  and choosing "Shelf==>Settings" and then selecting the "Auto -hide" option and then  applying the settings.
Enable Shelf Auto Hide
Shellementary
 Shellementary is an EFL based GUI application similar to zenity/kdialog and can provide GUI to shell scripts. I have tried to provide an information type of pop up using shellementary from terminology using the command shellementary --info --text 'e17 Rocks!'
E17 Shellementary openSUSE 12.2
More E17 Themes
 In "Changing backgrounds and themes in E17 openSUSE 12.2" i have dealt about downloading , installing and changing themes for E17 from 3rd party sites. But now openSUSE does offer many themes in its repos. If you had installed the packages as described earlier in the article you should be able to see many themes on your E17 desktop. All E17 themes packages in openSUSE repositories are named as "e-theme-*". It is very easy to find them in YaST. I have posted some theme screenshots below.
Detour, theme for Enlightenment 17.
Green, theme for Enlightenment 17.
OS Miguel theme
OS Miguel theme
OS Vision,Beige theme for Enlightenment 17
Theme darkness for Enlightenment 17
Theme efenniht for Enlightenment 17( incorporates cool wobble effects)

Saturday 19 January 2013

Custom Keyboard Shortcuts on GNOME 3.4.2 openSUSE 12.2

 Keyboard shortcuts are custom key mappings that are registered in the Desktop Environment (DE) and are very useful in quickly accessing commonly used applications or running scripts. In order to create keyboard shortcuts on GNOME 3.4.2 we need to follow the following steps:-
 Press the left win key (or) press "Alt+F1" to bring up the "Activities"  launcher or window. Type in the keyword "keyboard" and it will bring up the search results. We need to select the keyboard icon that shows up.
GNOME 3.4.2 ACTIVITIES KEYBOARD
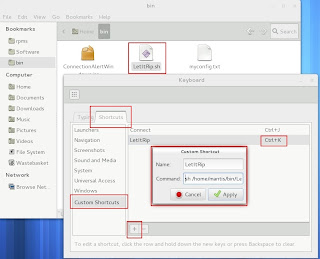
 In the keyboard application we need to open the "Shortcuts" tab and choose "CustomShortcuts" menu. Then we can press the plus (+) button to create a new shortcut. One clicking plus we get a pop up window where we can type in a "shortcut name" and "shortcut command" as shown below. If you need to execute a jar then, you will need to provide full path of the jar  "java -jar '/home/<profileName>/bin/doIt.jar'". After creating the shortcuts we can assign the keymappings by double clicking on the newly created shortcut and typing in the shortcut "ctrl+j" or the shortcut of your choice.
GNOME 3.4.2 CUSTOM KEYBOARD SHORTCUT
 Similarly, we can trigger scripts (Sample Script) using custom keyboard shorcuts. We need to ensure that we are appending an "sh" and providing the full path to the executable script as shown below.
GNOME 3.4.2 CUSTOM KEYBOARD SHORTCUT EXECUTE SCRIPT
 If you get an error like "The shortcut ... is already used for..." as shown below then it means that the shorcut is already assigned to another application either by you or the (DE).
GNOME 3.4.2 CUSTOM KEYBOARD SHORTCUT ASSIGN ERROR

Cool messages on terminal emulators

 I have talked about editing "~/.bashrc" in Change Command Prompt article earlier. Similarly, you can customise your terminal further by editing this file. I have described one such customisation below. If you are feeling bored on seeing the blank terminal every time you open it and you are cool with the idea of reading some random messages / quotations then you need to use a program called "fortune". Fortune displays a random text string from a set of files in a certain format. Fortune is installed by default on openSUSE 12.2 / GNOME 3.4.2.
  All you need to do now is add a small script at the end of the file "~/.bashrc" to display the quotations in terminal. This script should already be available in  the file "~/.profile" where "~" your home directory. You can copy paste it from there and remove the comment symbols(#) from the script for it to work. The first line in the below checks whether fortune exists on you machine. The echo lines are for displaying empty lines before and after the random quotations. Finally you close the "if" condition.
if [ -x /usr/bin/fortune ] ;
then
    echo
    /usr/bin/fortune
    echo
fi
Sample output from gnome-terminal on openSUSE 12.2 / GNOME 3.42
Gnome Terminal Fortune
If you need shorter messages you can use -s option
if [ -x /usr/bin/fortune ] ;
then
    echo
    /usr/bin/fortune -s
    echo
fi
 There are a lot of other customisation options available in fortune for which you need to read the man pages (manual). You may check out man here Demystifying Man

Screenshots of multiple webpages using openSUSE 12.2 GNOME 3.4.2

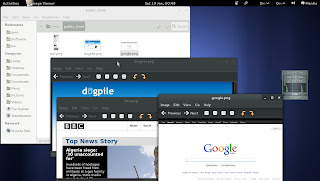
 In order to capture screenshots of multiple webpages using openSUSE 12.2, GNOME 3.4.2 we need to use a screenshot tool can "gnome-web-photo". GNOME Web Photographer is a tool that can be used to generate full-size image files and thumbnails from HTML files and web pages. Optionally, we can use zenity (GNOME Command Line Dialogue Utility) to inform the user about the completion of the process through an alert window. Both these packages should be installed by default on openSUSE 12.2, GNOME 3.4.2.
The usage of both the commands are as follows:-
Usage: gnome-web-photo [--mode=photo|thumbnail|print] [...]
Usage:  zenity [OPTION…]
  1. First we open nautilus and go to ~/bin folder , right click and choose "Create New Document" and then click on the submenu "Empty Document". We choose the newly created file and hit "F2" and rename the file to something like "LetItRip.sh".
  2. Then we right click on "LetItRip.sh" and choose file "Properties" . In the properties window  we open the "Permissions" tab. Here we will find a checkbox labelled "Execute". We select this checkbox and and close the properties window.
  3. We can then add the following lines of code to take the screenshots of relevant websites and put them in "public_html" folder.
/bin/sh -c 'gnome-web-photo  --mode=photo --file     http://www.dogpile.com ~/public_html/dogpile.png';
/bin/sh -c 'gnome-web-photo  --mode=photo --file     http://www.google.com    ~/public_html/google.png';
/bin/sh -c 'gnome-web-photo  --mode=photo --file     http://www.bbc.com    ~/public_html/bbc.png';
/bin/sh -c 'gnome-web-photo  --mode=thumbnail --file     http://www.dogpile.com ~/public_html/thumb_dogpile.png';
zenity --info --text "Capture Complete";
Notes :-
  • sh shell, the standard command language interpreter;
  • -c option reads commands from command_string operand;
  • --mode option tells us whether photo or thumbnail will be generated;
  • --file option specifies the URL that needs to scraped;
  • zenity is command used to create alert windows;
  • --info option tells zenity to display a "info" type alert;
  • --text is used to specify the text that zenity should display in the alert window;
 Create executable file and plugin the code as shown below
Executable file gnome-web-photo
Double click on executable and click on "Run" button. After creation of the screenshots you should see an alert like this.
gnome-web-photo execution
public_html folder with screenshots created from websites
gnome-web-photo website screenshot generated

Monday 14 January 2013

Formatting Contents inside code tags in blogger

HTML CODE
 This post explains a simple way to format the contents in code tags in blogger. This enables distinguishing content between "source code" and  rest of the post .i.e It helps in highlighting the source code in the post. We need to use some CSS to accomplish this.
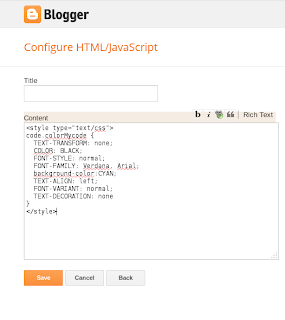
  We need to first login into "blogger.com" and then navigate to "Layout" page and then create a new "HTML/JavaScript" gadget and add the below contents inside it and save it.
    <style type="text/css">
    code.colorMycode {
    padding:0.5em;
    color:white;
    background-color:gray;
    clear:left;}
    </style>
Notes:- code represent code tag , "colorMycode" is the class you need to use the <code> tag
Screenshot of gadget addition should look like this
Blogger Add HTML JavaScript Widget
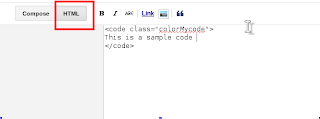
 When composing a post and you want to add source code you then need to open the HTML mode as shown below and plugin the <code> tags otherwise they would be rendered as it is. i.e. <code> tags will not work in compose mode.
Screenshot showing post being made in HTML mode in blogger
Blogger Post Editor HTML Mode
 When adding the code in the post you need to ensure that you add a class attribute within the <code> tag as shown below. You should use the same "class" name which is "colorMycode" as defined in the gadget above. Type the below code in HTML mode of the post editor.
<code class="colorMycode">This is sample code</code>
 To test whether the source code highlighting works you may click on preview button in the editor and check the content of code tag as shown below.
Working Preview Code Highlighting Blogger
Citation :- Creating a homepage without tables

Adobe Flash Versus GNOME Totem Vegas on openSUSE 12.2 GNOME 3.4.2

Totem Vegas Flash Plugin
 Totem, the good old Multimedia player from GNOME stable has become the new superstar in Linux world after it has come out with its own flash compatible plug-in that allows Linux users to play flash videos from major video streaming sites like youtube and metacafe. Vegas servers as a good alternative to Adobe Flash for playing flash videos in the aforementioned sites.
 The new Totem plug-in is called (vegas) browser plugin. Totem is multimedia player for the GNOME desktop based on GStreamer framework. The "totem-browser-plugin-vegas" allows one to play  Flash videos with virtually any browser like Firefox, Seamonkey, Opera etc. The advent of Vegas is good news especially since Adobe has stopped providing Flash Player for Linux.
Vegas Pluses
  • Can be installed along side Adobe Flash.
  • Works on variety of browsers.
  • Supports fullscreen and non fullscreen modes.
  • Can be easily disabled and enabled as described below.
Install Vegas
Various things to do before installing Vegas on openSUSE 12.2 are:-
  • Configure "Community repositories" using YaST similar to what is described in this post.
  • Finish the Multimedia related steps described in this post.
Install Vegas using YaST
 To locate YaST installer on GNOME 3.X desktop you can use the left "win" key or "Alt+F1" key combination to open "Activities" window. In this window you can start typing a search query like "install" when YaST installer will show up grouped under "Applications" as shown below.
GNOME 3.4.2 YaST Installer
 After opening YaST installer you can type in the search query in YaST as shown below.  After locating Vegas you can select the required software using the relevant checkbox . To complete installation you can press the "Apply" button.
GNOME 3.4.2 YaST Installer Totem Vegas
Install Vegas using zypper.
 First we need to open command launcher using key combination "Alt+F2" . Then invoke the terminal using the command "gnome-terminal". After terminal opens, we can use the "zypper" command to install the relevant packages as shown below.
$sudo -u root zypper in totem*vegas*
Loading repository data...
Reading installed packages...
Resolving package dependencies...
The following NEW package is going to be installed:
  totem-browser-plugin-vegas
1 new package to install.
Overall download size: 56.0 KiB. After the operation, additional 71.5 KiB will
be used.
Continue? [y/n/?] (y): y
Retrieving package totem-browser-plugin-vegas-3.4.3-1.1.1.x86_64
                                           (1/1),  56.0 KiB ( 71.5 KiB unpacked)
Retrieving: totem-browser-plugin-vegas-3.4.3-1.1.1.x86_64.rpm[done (58.5 KiB/s)]
Installing: totem-browser-plugin-vegas-3.4.3-1.1.1 .......................[done]
Notes:- "sudo" is command to execute a command as another user , "-u" option specifies the user which is "root" in this case, "zypper" is the command for managing packages, "in" option stands for installation, zypper allows wildcards like "*" while specifying package names.
Configure Vegas as Flash player
 To configure Vegas as the default plugin to handle flash content on your browser of choice, you may need to disable the Adobe flash plugin. You can easily do this using "Add-ons Manager" in Firefox and SeaMonkey as shown below.
Configure Vegas Flash Plugin Addon Manager SeaMonkey Firefox
 Similarly in Opera you need to open the "opera:plugins" page through the location or address bar and disable the relevant plugin.
Configure Vegas Flash Plugin Opera opera:plugins
Screenshot of Youtube video in Opera played using Vegas
Youtube video in Opera played using Vegas
Screenshot of Metacafe video in SeaMonkey played using Vegas
Metacafe video SeaMonkey Vegas
Short Video Clip comparing the working of Vegas and Adobe Flash
 This is a short screencast comparing video playing capability of Adobe Flash plug-in (Opera) and Totem plug-in Vegas (SeaMonkey). Screen capture done on GNOME 3.4.2 desktop using built in Screencasting tool. Control+Shift+Alt+R keybinding starts and stops the recording. The screencast was generated in "*.webm" format and is readily compatible with youtube. The video first shows SeaMonkey playing Metacafe and Youtube videos in fullscreen and normal mode using Vegas plugin . Then we switch over to Opera which plays same videos using flash plugin. The Screencast proves beyond a doubt that Vegas has good video playing capability and can switch quite smoothly between normal and full screen modes :-)